Winter can be beautiful, but it can also be one of the most damaging seasons for your roof. Heavy snow, freezing temperatures, and repeated freeze-thaw cycles can create serious roofing problems, especially ice dams. When snow melts and refreezes near the edges of a roof, it can block proper drainage and force water underneath shingles. Over time, this trapped moisture can cause leaks, insulation damage, and costly repairs.
One of the most effective ways to prevent these winter roofing issues is by installing heat tape, also known as a roof heating cable. Heat tape systems gently warm specific areas of the roof, allowing melting snow and ice to drain properly through gutters and downspouts instead of refreezing.
Rather than constantly shoveling your roof or applying chemical de-icers, heat tape offers a long-term solution for ice dam prevention. It works quietly in the background, keeping roof edges just warm enough to allow water to flow freely even during harsh winter conditions.
In this guide, we will walk you through everything you need to know about roof heat tape, including:
-
What heat tape is and how it works
-
The different types of heat cables available
-
When and where heat tape should be installed
-
A detailed step-by-step installation process
-
Safety tips and maintenance advice
-
When to hire a professional roofer
By the end of this article, you’ll have a clear understanding of how roof heating cables protect your home and how they can help extend the life of your roof during winter.
What Is Heat Tape and Why It’s Important
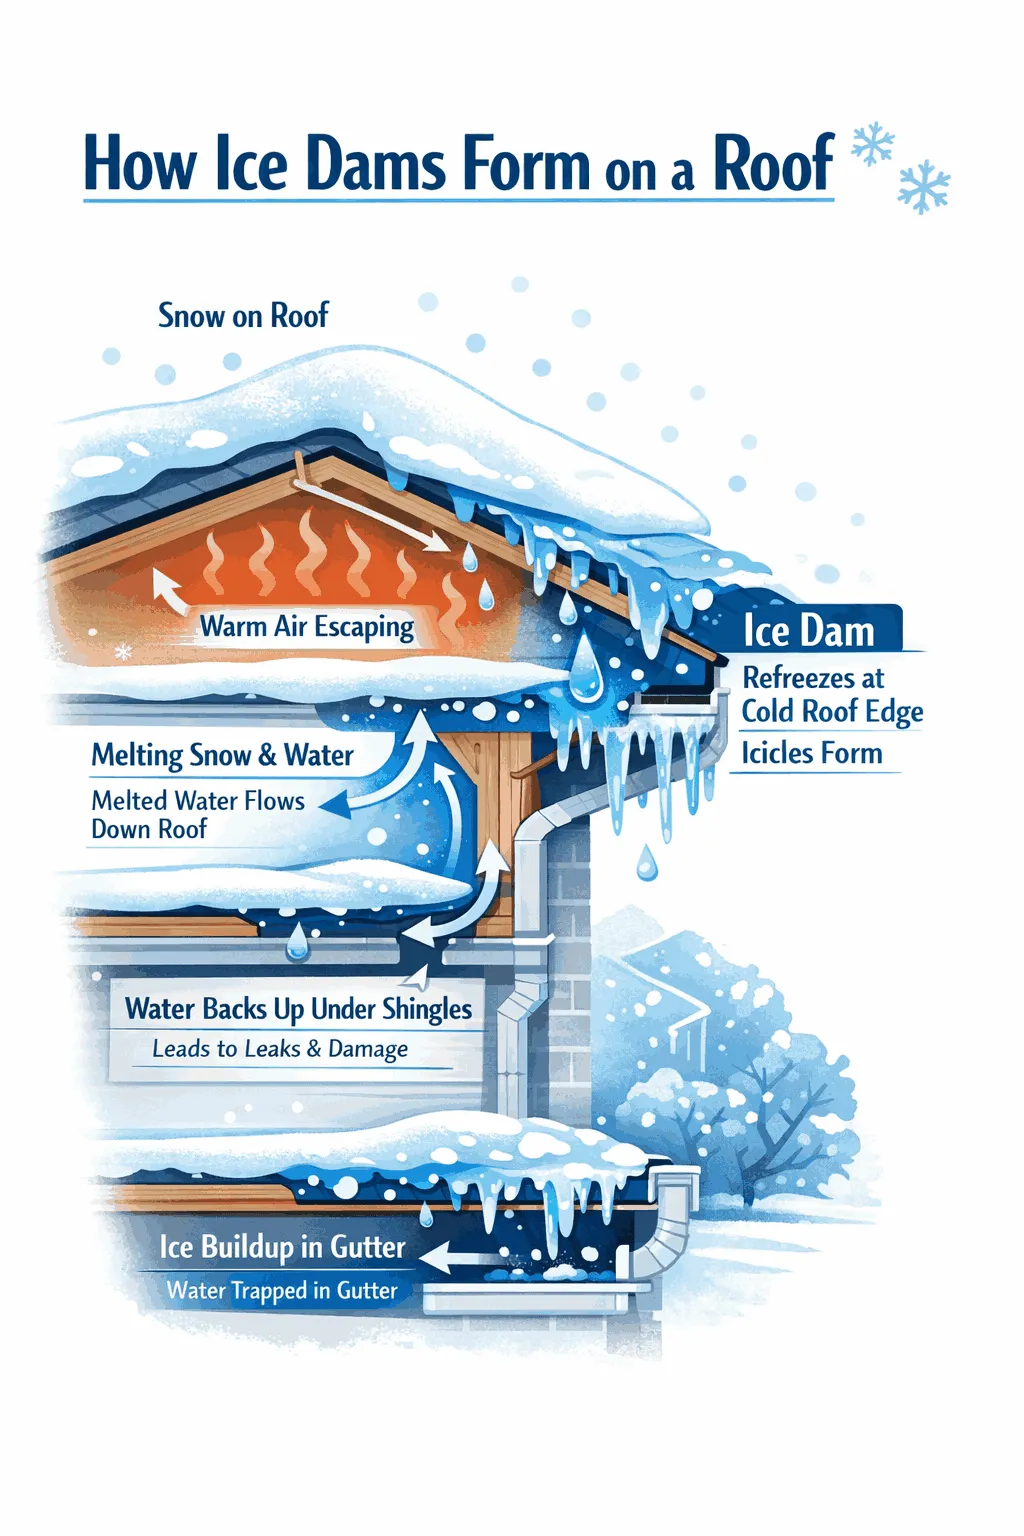
Heat tape is an electrically powered cable designed to generate controlled heat along roof edges, gutters, and downspouts. The purpose of this cable is to maintain a narrow channel where melted snow can safely drain off the roof before it refreezes.
Without proper drainage, snowmelt can freeze at the colder edge of the roof, forming a ridge of ice called an ice dam. Ice dams block water from flowing off the roof, causing water to back up underneath shingles and roofing materials.
Over time, this can lead to several serious issues, including:
-
Water leaks inside the home
-
Damaged roof shingles
-
Mold and mildew growth in the attic
-
Insulation deterioration
-
Structural wood damage
-
Interior ceiling stains
Heat tape prevents these problems by keeping the roof edge slightly above freezing, allowing melted snow to move safely into the gutter system.
This is particularly important in regions with frequent freeze-thaw cycles, such as coastal climates or areas with fluctuating winter temperatures. In places like Long Island, for example, temperatures often rise during the day and drop at night, creating the perfect conditions for ice dam formation.
By maintaining a consistent drainage path, heat tape helps protect both the roof and the interior of the home from winter damage.
How Heat Tape Works
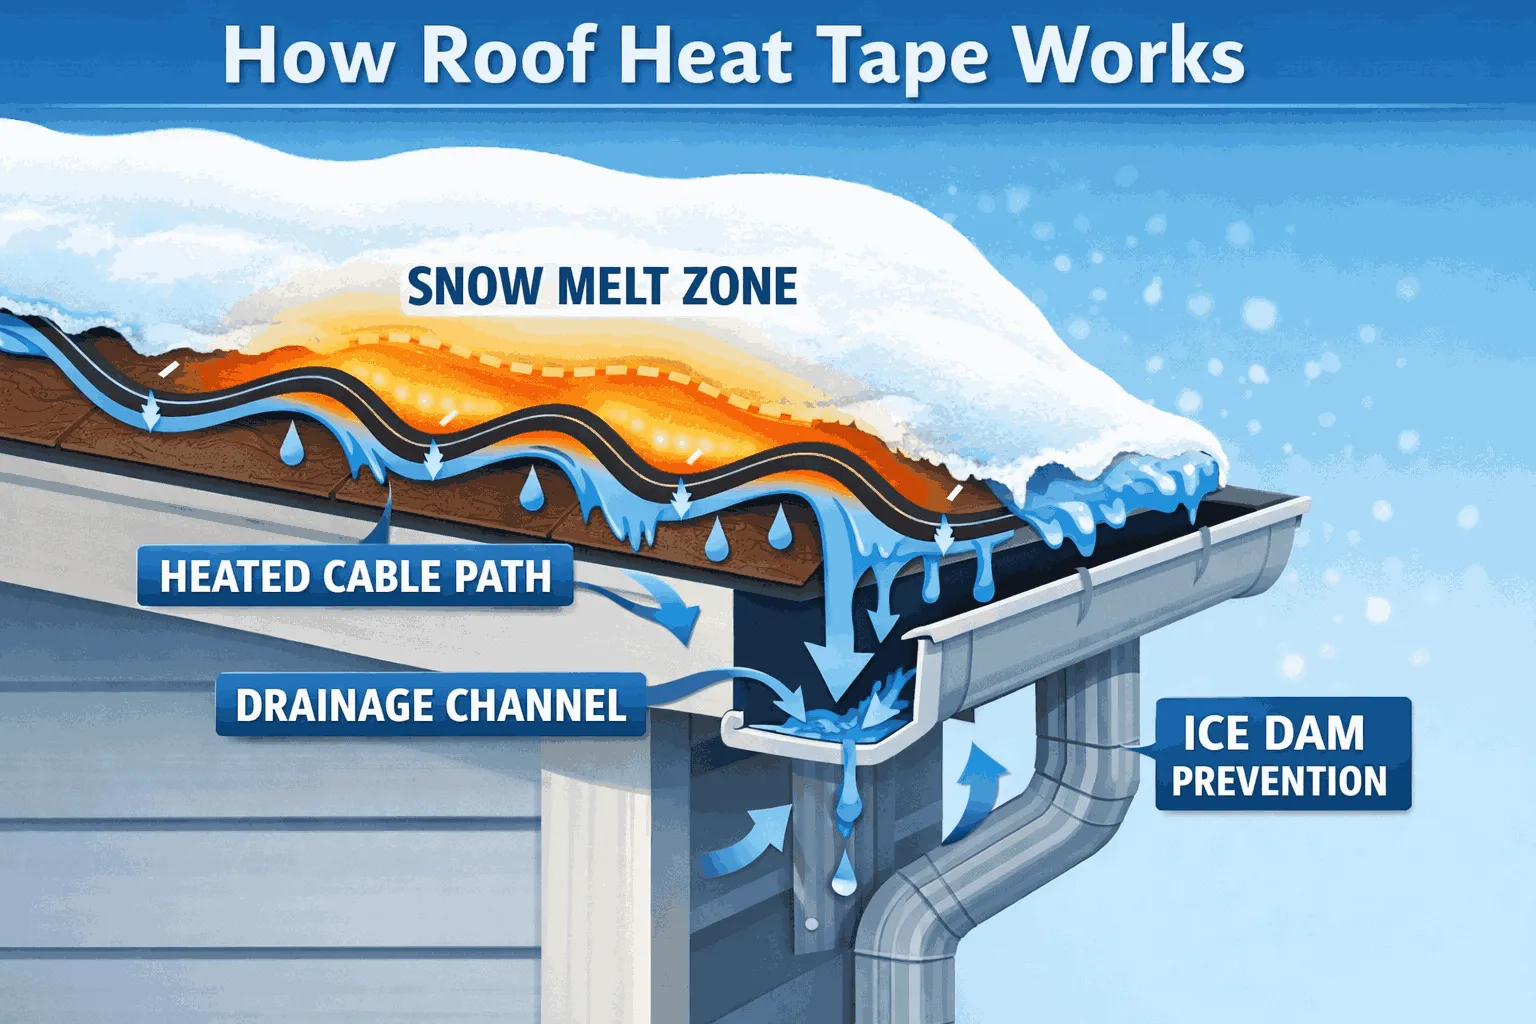
Roof heating cables operate through electric resistance heating. Inside the cable are conductive wires that produce heat when electricity flows through them.
When installed correctly along the roof edge and gutters, the cable warms nearby roofing materials just enough to melt snow and ice in controlled sections.
Instead of allowing snow to melt randomly and refreeze at the roof edge, heat tape creates small drainage channels that guide water safely away from the roof.
These channels prevent the buildup of ice ridges while allowing the majority of the roof to remain naturally cold.
The goal is not to melt all snow on the roof, but rather to maintain open pathways for water drainage.
Types of Heat Tape for Roofs
Before installing heat tape, it’s important to choose the right type for your roof and climate conditions. There are several kinds of roof heating cables available, each with its own advantages.
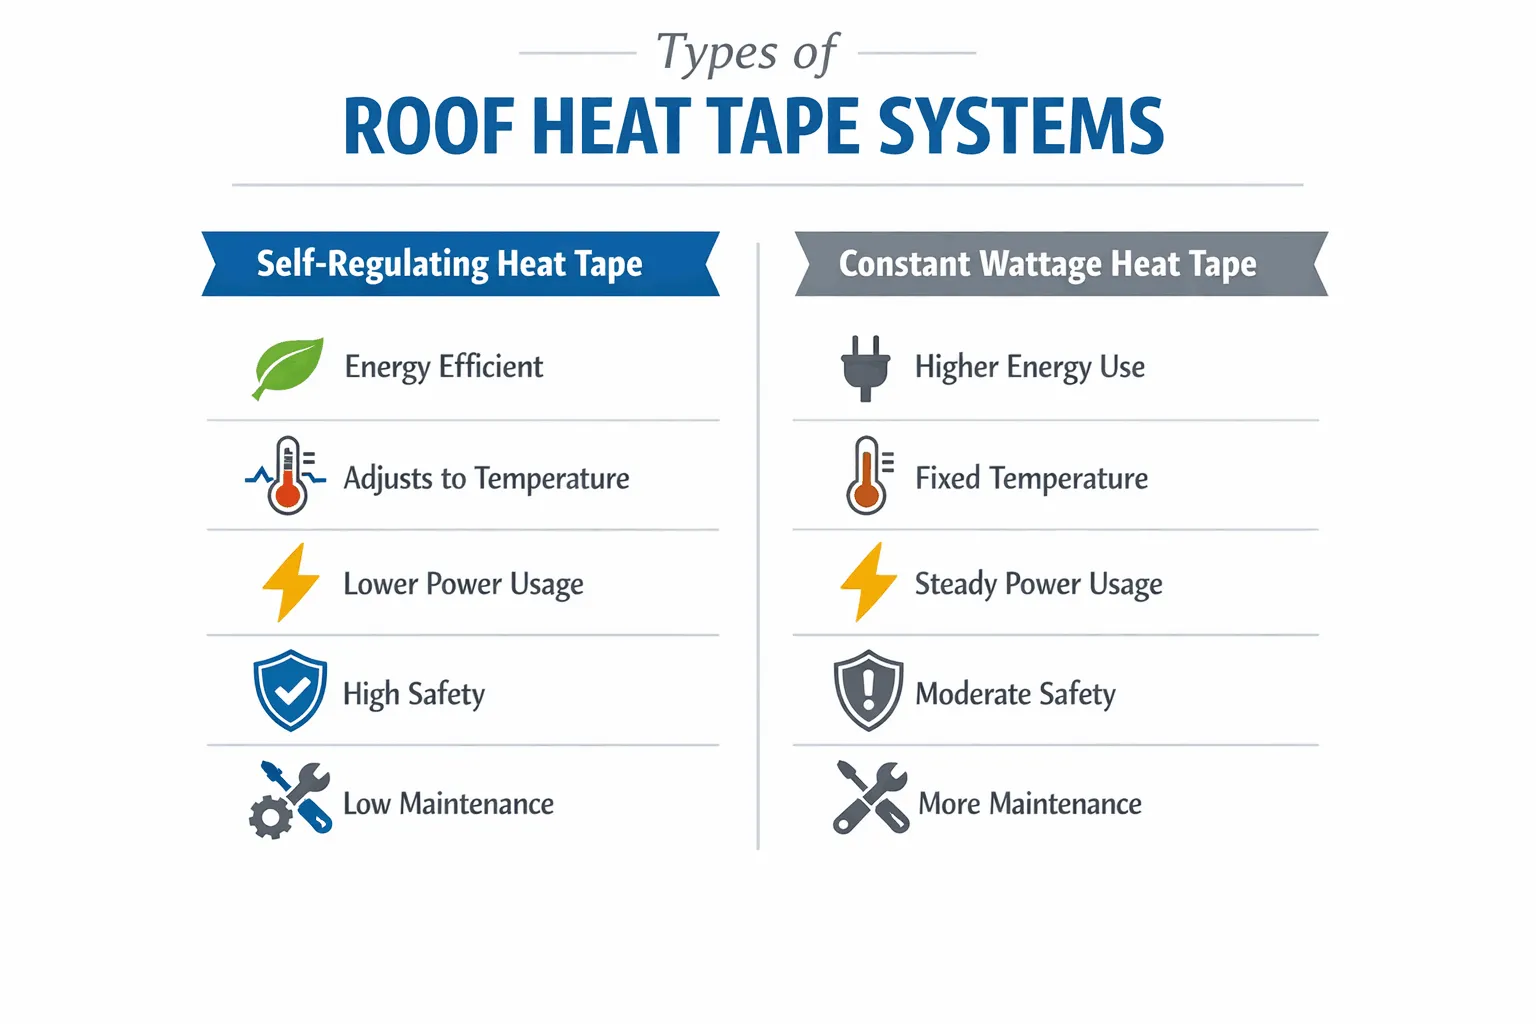
Self-Regulating Heat Tape
Self-regulating heat tape is one of the most popular options for residential roofing systems. These cables automatically adjust the amount of heat they produce based on the surrounding temperature.
When the temperature drops, the cable produces more heat. When temperatures rise, the cable reduces its heat output.
This built-in adjustment provides several benefits:
-
Improved energy efficiency
-
Reduced risk of overheating
-
Longer cable lifespan
-
Lower electricity usage
Because the cable only generates heat when necessary, it is considered one of the safest and most efficient options for homeowners.
Best For:
Homes in colder climates that require reliable and low-maintenance ice dam protection.
Constant Wattage Heat Tape
Constant wattage heat cables produce the same amount of heat regardless of the outside temperature.
While they are typically less expensive than self-regulating systems, they can use more electricity and may require additional monitoring to prevent overheating.
These cables are often used in shorter installations or areas where precise temperature control is not critical.
Best For:
Small roof sections or controlled heating applications.
Manual Heat Tape Systems
Manual heat tape systems require homeowners to turn the system on and off depending on weather conditions.
While these systems are simple to install, they rely heavily on the homeowner remembering to activate them before snow and ice buildup begins.
If forgotten, ice dams may form before the system is activated.
Thermostat-Controlled Heat Tape Systems
More advanced systems include a thermostat or moisture sensor that automatically turns the heating cables on when temperatures approach freezing.
These systems improve efficiency by activating only when needed.
Benefits include:
-
Reduced energy consumption
-
Automatic operation
-
Longer cable lifespan
-
Consistent winter protection
For most homeowners, thermostat-controlled systems offer the best balance between convenience and efficiency.
Where Heat Tape Should Be Installed
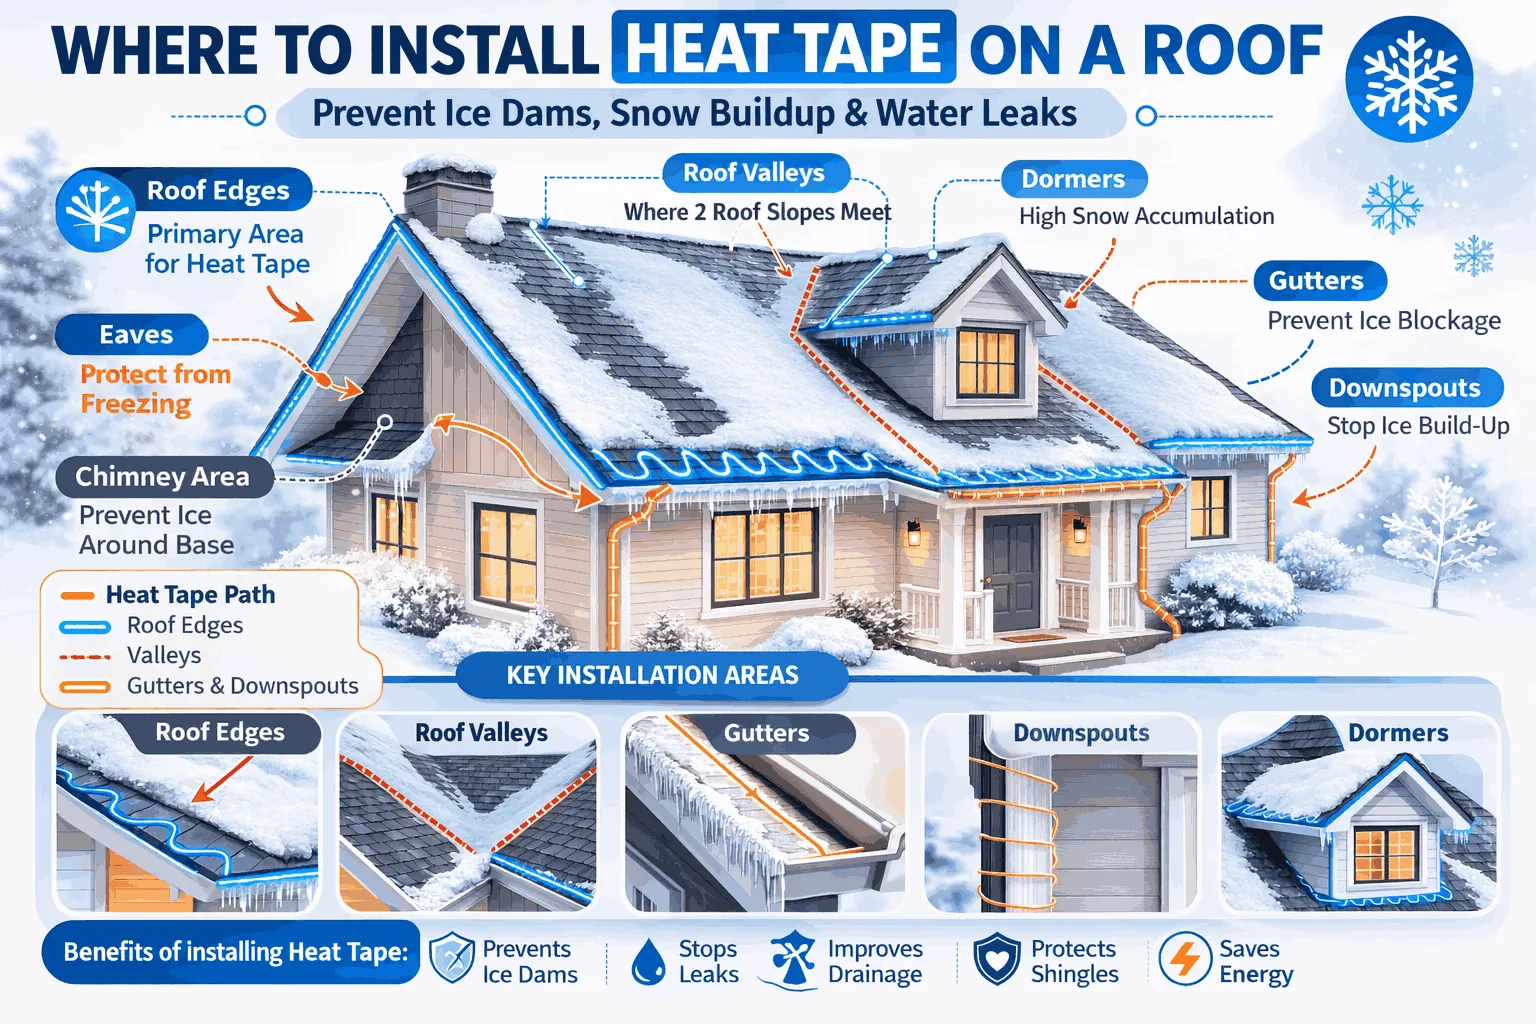
Heat tape should be installed in areas where ice dams and ice buildup are most likely to occur.
The most common locations include:
Roof Edges
The lower edge of the roof is the most common area for ice dams because it is colder than the upper roof sections.
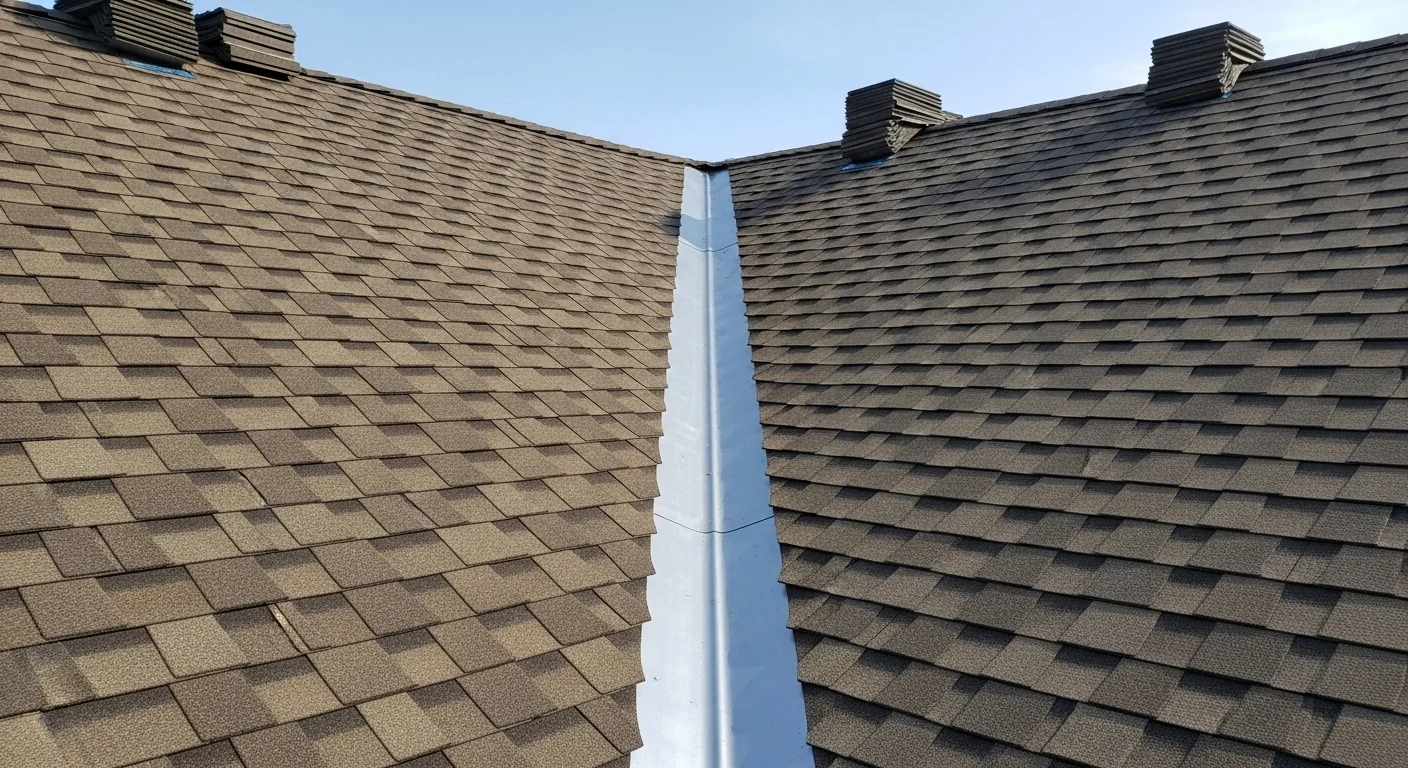
Roof Valleys
Valleys collect large amounts of snow and melting water, making them a prime location for ice buildup.
Gutters
Ice can accumulate inside gutters and block water flow.
Downspouts
If downspouts freeze, water cannot drain from the gutter system.
Dormers and Roof Transitions
Complex roof designs often create cold pockets where ice dams can form.
Installing heat tape in these areas helps maintain clear drainage pathways during winter storms.
Step-by-Step Guide: How to Install Heat Tape on a Roof

Proper installation is essential for ensuring the system works effectively and safely.
Below is a step-by-step guide to installing heat tape on your roof.
Step 1: Plan the Cable Layout
Before installing heat tape, inspect your roof carefully and identify areas where ice tends to accumulate.
Common trouble spots include:
-
Roof edges
-
Valleys
-
Gutters
-
Downspouts
-
Areas beneath attic vents
The most common installation pattern along roof edges is a zigzag pattern.
This pattern allows heat to cover a wider section of the roof edge and helps create multiple drainage channels.
Measure the total length of cable required, including extra length for gutters and downspouts.
Planning the layout beforehand helps ensure the cable reaches all necessary areas.
Step 2: Inspect the Roof and Gutters
Before installation begins, thoroughly inspect your roof and gutter system.
Look for:
-
Loose shingles
-
Cracked flashing
-
Blocked gutters
-
Damaged roofing materials
-
Debris buildup
Remove leaves, dirt, and debris from the gutters and downspouts.
A clean roof surface ensures that clips and adhesive materials will hold properly.
Address any roofing damage before installing heat tape.
Step 3: Install Roof Clips
Heat tape is typically secured to the roof using specialized clips designed for roofing systems.
These clips attach to shingles and hold the cable in place without damaging the roof.
Most manufacturers recommend spacing clips 12 to 18 inches apart.
Important tips:
-
Never nail or screw through shingles
-
Use adhesive clips or roof-safe sealant
-
Follow the manufacturer’s spacing instructions
-
Keep clips aligned for even cable placement
Proper clip installation ensures the cable remains secure during wind and snowstorms.
Step 4: Attach the Heat Tape
Once the clips are in place, carefully place the heat tape along the planned route.
Follow the zigzag pattern along the roof edge and extend the cable into the gutters if necessary.
When handling heat tape:
-
Avoid sharp bends
-
Do not twist or kink the cable
-
Keep the cable evenly spaced
-
Avoid overlapping sections
Overlapping cables can cause overheating and damage.
For gutters and downspouts, special hanger clips are used to suspend the cable safely inside the drainage system.
Step 5: Route the Power Cord
Most heat tape systems plug into a ground fault circuit interrupter (GFCI) outlet.
This type of outlet automatically shuts off power if an electrical fault occurs, reducing the risk of shock.
When routing the power cord:
-
Keep it away from sharp edges
-
Avoid areas where snow may accumulate heavily
-
Attach the cord along the fascia board or eaves
-
Use weather-resistant cable clips
If your home does not have a nearby GFCI outlet, a licensed electrician should install one.
Step 6: Install the Thermostat Sensor
If your system includes a thermostat or moisture sensor, it must be installed in a location where it can accurately detect outdoor conditions.
The sensor is typically placed near the roof edge or under the eaves.
Most systems activate when temperatures drop near 35°F (1–2°C) and shut off when temperatures rise above freezing.
This automatic operation helps reduce energy usage while keeping the roof protected.
Step 7: Connect and Test the System
After installation is complete, connect the heat tape to the power source.
Before winter arrives, test the system to ensure everything is working correctly.
You can check the system by:
-
Using a circuit tester
-
Measuring voltage with a multimeter
-
Feeling for warmth along the cable
Within about 5 to 10 minutes, the cable should begin to feel warm.
If certain sections remain cold, inspect for:
-
Loose connections
-
Kinked cables
-
Damaged insulation
Correct any issues before the winter season begins.
Step 8: Final Inspection and Weatherproofing
After testing the system, inspect the entire installation carefully.
Check that:
-
Cables are evenly spaced
-
Clips are securely attached
-
No sections overlap
-
Power connections are sealed
Use weatherproof electrical tape or heat shrink tubing to protect exposed connectors from moisture.
A properly installed system should look neat, secure, and well-organized.
Safety Tips for Installing Heat Tape
Roof heat tape systems are generally safe when installed correctly, but certain precautions should always be followed.
Important safety tips include:
-
Always follow manufacturer instructions
-
Use only cables designed for roofing systems
-
Avoid crossing or overlapping cables
-
Plug the system into a GFCI outlet
-
Inspect the cable before each winter season
-
Replace damaged cables immediately
Never attempt to install heat tape during icy or snowy conditions.
Roof work should always be performed in safe weather.
Maintenance Tips for Roof Heat Tape
Regular maintenance helps ensure your heating cable system continues working efficiently for many years.
Recommended maintenance steps include:
Annual Inspection
Check cables for cracks, wear, or damage before winter begins.
Clean Gutters
Remove leaves and debris that could block drainage.
Test the System
Turn the system on briefly to confirm the cables heat up properly.
Check Electrical Connections
Ensure all connectors remain sealed and weatherproof.
Proper maintenance helps extend the life of the system and ensures reliable winter performance.
When to Call a Professional
Although installing heat tape can be a DIY project, it does involve working on the roof and handling electrical components.
Improper installation can create safety hazards or reduce the effectiveness of the system.
Professional roofers have the experience to:
-
Properly size the heat cable system
-
Install cables safely
-
Ensure electrical connections meet code requirements
-
Customize installation based on roof design
Homes with steep roofs, metal roofs, or complex drainage systems may especially benefit from professional installation.
Conclusion
Installing heat tape on your roof is one of the most effective ways to prevent ice dams, winter leaks, and snow-related roof damage. By maintaining clear drainage channels along the roof edge, heat tape allows melted snow to safely flow through gutters and downspouts instead of refreezing.
With the right planning, materials, and installation techniques, a roof heating cable system can provide reliable winter protection for many years.
However, because the installation involves electrical components and rooftop work, many homeowners prefer to have the system installed by experienced roofing professionals.
A properly installed heat tape system not only prevents ice dams but also helps extend the life of your roof, protect your attic insulation, and prevent costly interior water damage.
If you live in a region with heavy snowfall and freezing temperatures, investing in roof heating cables can be a smart and practical way to keep your home safe throughout the winter season.